July 5, 2016: Facebook may not be the social network that businesses first think of when contemplating a lead generation platform, but Facebook wants to change that perception, and so, in October of 2015, it added Leads as a business objective within its ad console and built out functionality allowing this.
Before we take you through the mechanics of building a Facebook Leads ad, it’s good to get an overview of what kinds of business people are on Facebook, which industries they belong to, and also, how big their employers are.
Here’s how Facebook breaks out the numbers on the U.S.-based business people using its platform:
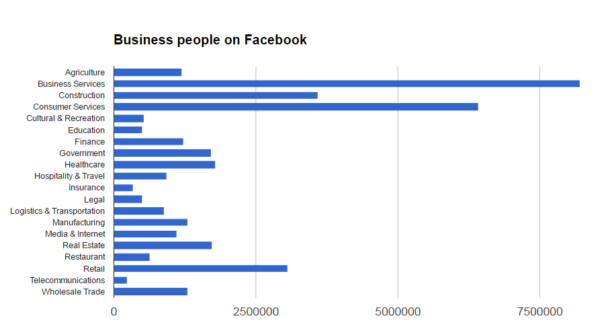
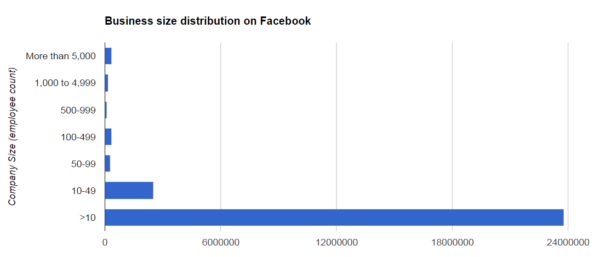
As you can see, this is a very wide range of business people, which makes Facebook look – at least at a surface level – very promising in terms of lead gen potential. At the same time, however, as the chart below reveals, the bulk of Business people on Facebook don’t work for large companies. The overwhelming majority of them work for small firms, in many cases individual proprietorships. So Facebook probably isn’t going to be a good place if you’re selling big-ticket items such as nuclear reactors or corporate PBX systems. On the other hand, if you’re selling something that small business people might really need (for example, an outsourced payroll solution), this market might be perfect for you.
Getting started with Facebook Lead Ads
The good news is that Facebook’s Lead Ads are very easy to configure. In fact, if your creative is already done, it’s likely that you can get one up and running in about 15 minutes.
Here are the steps involved:
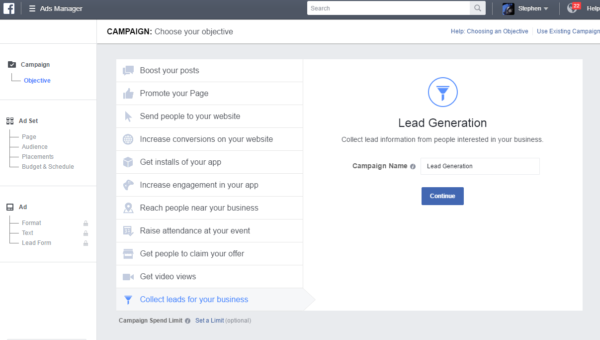
Step 1: Log into Facebook’s Ad Manager and Choose – as your Campaign Objective – “Collect leads for your business.”
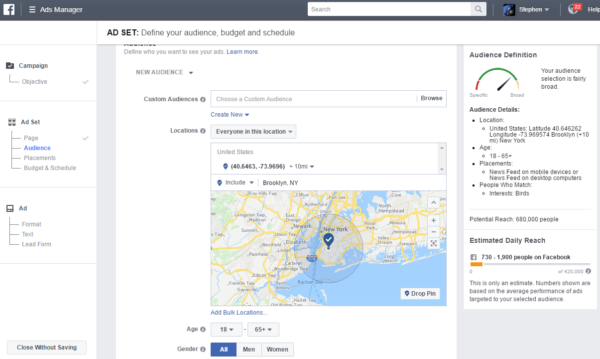
Step 2: Choose your targeting. For this test campaign, I chose a geographically targeted campaign that would only display for Facebook users in Brooklyn, NY. For a serious B2B lead gen marketer, you’d likely want to choose additional targeting parameters more likely to surface qualified leads for your particular business, for example by targeting individuals at certain spend levels, in certain zip codes, those expressing an interest in certain subjects, or other criteria. Facebook provides extensive data on its user base, augmented by data gathered from data brokers Experian and Acxiom, that provide for very precise targeting. Keep an eye on the “Audience Definition” gauge in the right panel; you want your target selection criteria to result in a “needle” that resides somewhere in the middle green band.
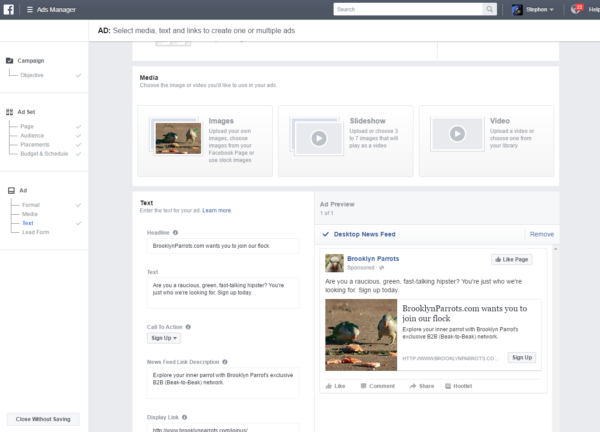
Step 3: Create your ad. For Lead Ads, Facebook offers you two choices: either a single-image/single-video ad unit, or a “carousel”-style ad with up to 5 images embedded within. To keep things simple, I chose a single-image ad unit. Add a headline, text (which will appear above the headline, and a call-to-action type (in this case, I chose “sign up” given that my objective was to coax people into signing up for my newsletter. As you make changes, the “Ad Preview” window will instantly reflect them, giving you a good idea of what your ad will look like wherever it appears on Facebook.
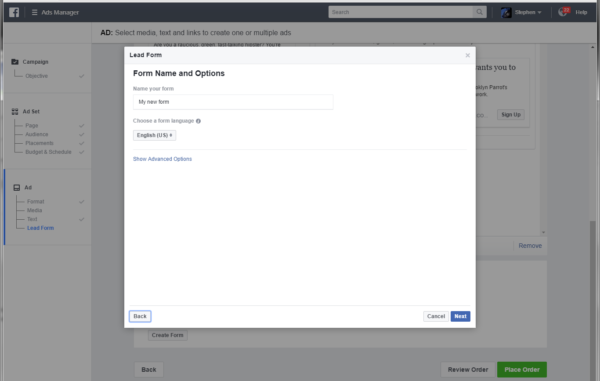
Step 4: Add a Context Card to your form. Although adding a Context Card is optional, it’s highly recommended. Context Cards give you a canvas for you to do a little additional selling that will (hopefully) move folks who clicked on your ad an even stronger motivation to give you their contact information.
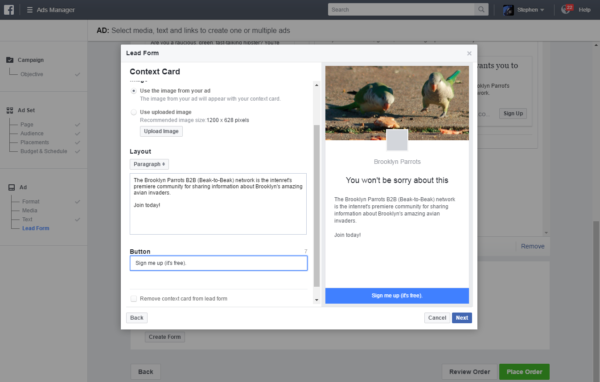
Unless you chose “Not Now,” it’s time to populate the Context Card with your own compelling content. You have the option to use the same image that appears in your ad, or one that’s different. You can have a choice of two different layouts to the card: bullet-points, or paragraph, plus the ability to set the button text to something a little more personal than “click here” or “submit.”
Step 5: Specify the data fields you want to collect. Facebook lets you specify which fields you want your prospects to fill out, down to a very granular level. It’s your call as to how many fields you want your users to fill out before sending the data, but as a general rule, your response rate will be inversely proportional to the number of fields you require to be filled out. Put more simply, that means that the fewer input fields, the better. The exception to this rule would be a business that expected to get a very high volume of leads and needs to pre-qualify leads prior to them being made available to their sales force.
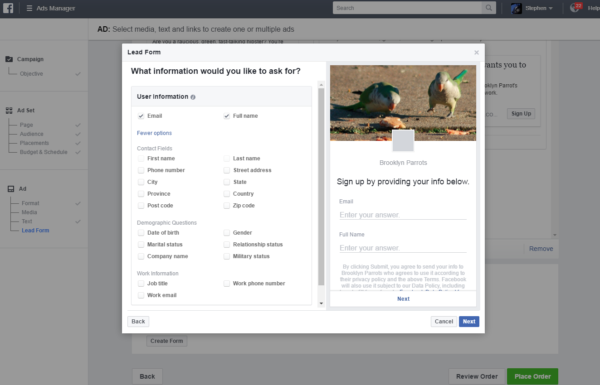
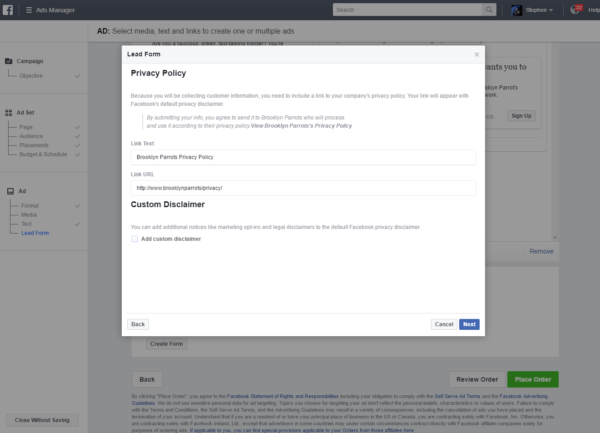
Step 6: Link to your Privacy Policy. Facebook is very sensitive to any accusation that might be made alleging that it plays fast and loose with its user data, which includes, of course e-mail addresses, which are, of course PII (personally identifiable information). Because Lead Ads will capture PII, Facebook requires that the form you create includes a link to your firm’s Privacy Policy. Furthermore, it won’t let you create any Lead Ads unless you agree to follow its own Lead Ads TOS document, which prevent you from reselling any PII data captured from Facebook, and otherwise restricts you (although in certain cases you can share this data with affiliates).
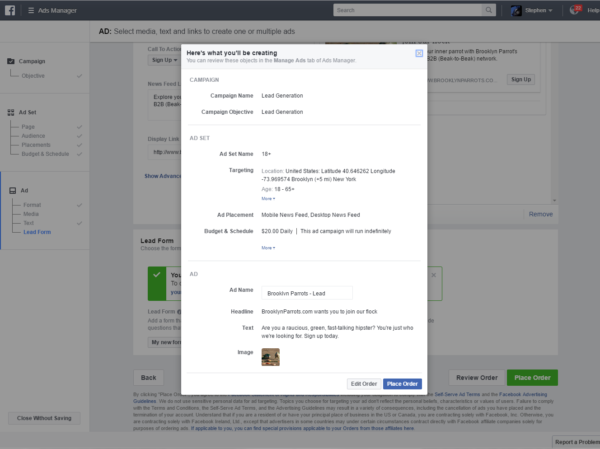
Step 7: Preview and Confirm. Before the ad begins to circulate and your bill begins to increment, Facebook lets you preview your form visually, in respect to which targeting parameters were chosen, where and when it will be placed, and how much budget is behind it. If all is not right, choose “Edit;” otherwise choose “Place Order” and your Lead Ad will begin to run. Once it starts gathering data (and leads!), you’ll be able to inspect your progress within Ad Manager.
Now go forth and start gathering business leads!
- 10 Mistakes to Avoid When Using QR Codes for Marketing - September 20, 2023
- Kevin Lee on How AI Changes the SEO Landscape - August 31, 2023
- The Power of Compound Marketing: Kevin Lee Presents @ 1MediaWorld 2023 Global Conference - March 7, 2023

